
1.首先需要装nginx和nginx-rtmp-module;
①首先下载一下几个文件,上传至Ubuntu /usr/local/src/ 目录并解压缩
tar -zxvf +文件名,保持几个文件都在src目录下

https://www.openssl.org/source/
 http://nginx.org/en/download.html
 https://github.com/arut/nginx-rtmp-module
②使用以下命令检查或者安装必要的环境
apt install gcc
apt install build-essential
apt install make
③cd到 nginx目录下
./configure –add-module=/usr/local/src/nginx-rtmp-module –with-http_ssl_module –with-openssl= /usr/local/src/openssl-1.1.1k –with-pcre=. /usr/local/src/pcre-8.42 –with-zlib=../zlib-1.2.11
④make && make install
2.配置nginx.conf
①在http模块上方添加 rtmp
#推流监听
rtmp {
server {
listen 1935; #监听的端口
chunk_size 4000;
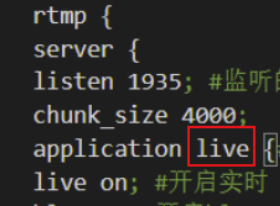
application live {#rtmp推流请求路径 (切记路径错了会推不上流)
live on; #开启实时
hls on; #开启hls
hls_path /usr/local/src/nginx/html/cctv; #rtmp推流请求路径,文件存放路径
hls_fragment 2s; #每个TS文件包含2秒的视频内容
hls_playlist_length 10s;
allow play all;
}
}
}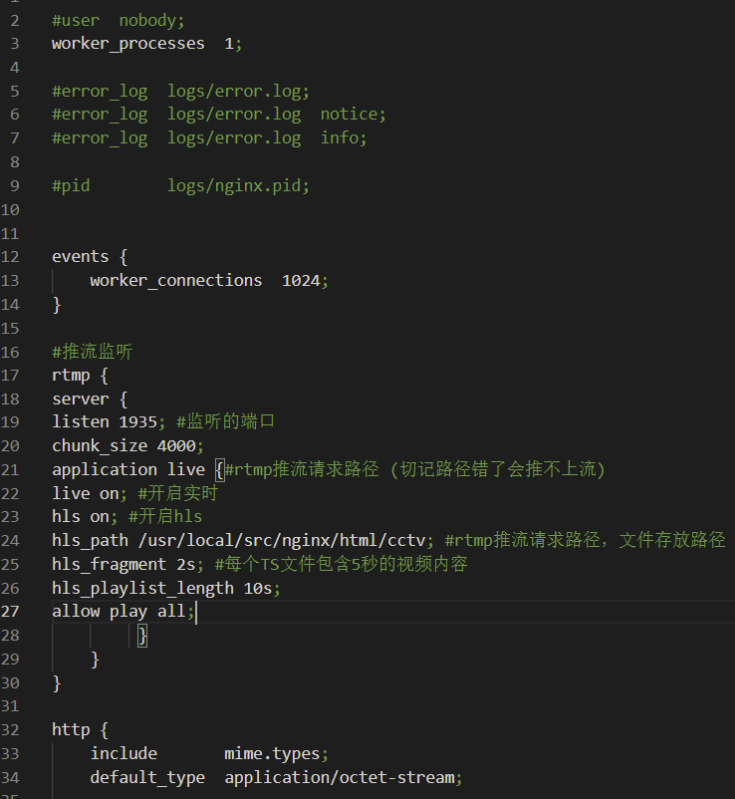
示例
②在http中server中添加
location /live {  #添加视频流存放地址要与application保持一致 。
                types {
                    application/vnd.apple.mpegurl m3u8;
                    video/mp2t ts;
                }
                #访问权限开启,否则访问这个地址会报403
                autoindex on;
                alias /usr/local/src/nginx/html/cctv/;#视频流存放地址,与上面的hls_path相对应,这里root和alias的区别可自行百度
                expires -1;
                add_header Cache-Control no-cache;
                #防止跨域问题
                add_header 'Access-Control-Allow-Origin' '*';
                add_header 'Access-Control-Allow-Credentials' 'true';
                add_header 'Access-Control-Allow-Methods' 'GET, POST, OPTIONS';
                add_header 'Access-Control-Allow-Headers' 'DNT,X-CustomHeader,Keep-Alive,User-Agent,X-Requested-With,If-Modified-Since,Cache-Control,Content-Type';
            }
示例
③文档末添加监控模块
server {
        listen       88; # 拉流使用的端口,使用默认端口80时,拉流时可不指定
        server_name  localhost;
        location /stat {
    	    rtmp_stat all;
    	    rtmp_stat_stylesheet stat.xsl;
    	}
    	# 查看状态的部分,下部分介绍,不需要可去掉
    	location /stat.xsl {
    	    root /usr/local/nginx-rtmp-module/;
        #nginx-rtmp-module文件夹目录
    	}
     }
至此nginx已经配置完成,启动nginx即可(注意关闭防火墙)
3.设置ops推流
推流地址为rtmp://ip地址:1935/live/
示例:rtmp://192.168.2.24:1935/live/
秘钥随便输入,但是后面拉流的时候会用到
4.使用VLC拉流
http://192.168.2.24/live/1.m3u8

